PulseChain Bridge
PulseChain Bridge is a decentralized bridge that allows users to easily and seamlessly transfer native and ERC-20 tokens between Ethereum and PulseChain and vice versa.
PulseChain Bridge stands as the critical infrastructure enabling users to move assets seamlessly between Ethereum and PulseChain. Users can bring assets from Ethereum into PulseChain using the bridge, which is a common path for those looking to participate in the PulseChain ecosystem. The bridge acts as an exchange point for assets between Ethereum and PulseChain, facilitating value transfer. Whether you are a seasoned user looking to transfer assets or a newcomer trying to understand how to add PulseChain to your wallet, this guide covers the essentials. We explore pulsechainbridge mechanics, how to buy PLS, and what to do if you find the pulsechain bridge not working.
The PulseChain Bridge interface is similar to popular decentralized exchanges (DEXs) like Uniswap, providing a familiar experience for swapping and bridging assets.
Always verify official URLs and explorers before you transact.
Introduction to the platform
The PulseChain Bridge is a censorship-resistant platform designed to make transferring assets between Ethereum and PulseChain straightforward. By using the official PulseChain Bridge, users can connect wallets and interact with the PulseChain network for cross-chain transfers. Getting started is straightforward: users add PulseChain to their wallet by entering the network name, chain ID, and contract address—essential steps that grant access to PulseChain services. Cross-check RPC URL and block explorer values against current official documentation.
Once connected, users can transfer assets while benefiting from PulseChain’s low gas fees and fast confirmations. The bridge’s infrastructure is built to keep transfers understandable and secure for users moving tokens between chains.
PulseChain ecosystem overview
The PulseChain ecosystem is a decentralized network focused on efficient, censorship-resistant tools for digital assets. The PulseChain Bridge enables cross-chain transactions so users can transfer assets, trade tokens, and use dApps across the network.
Developers can build dApps that target lower fees and faster confirmations than many legacy networks. Users gain access to trading, swaps, and liquidity venues such as PulseX. The bridge supports ecosystem growth by moving value across chains and onboarding liquidity and projects.
For the latest official links and guides, follow project announcements and community resources you trust.
Quick answer: how to use the PulseChain Bridge in 2026
The official pulsechain bridge is a primary way to move assets between Ethereum and PulseChain. Whether you call it PulseRamp, PulseBridge, or pulsechainbridge, the flow is broadly the same—always confirm you are on an official front-end.
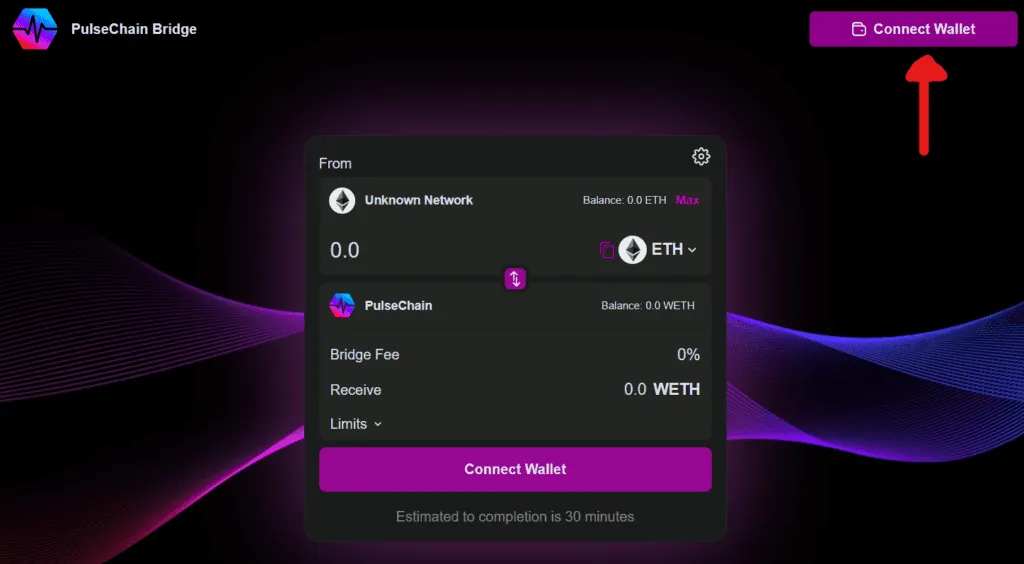
- Connect your wallet (for example MetaMask or Rabby) to the Ethereum network when bridging in from Ethereum.
- Visit the official pulse chain bridge front-end linked from official PulseChain sources.
- Select Ethereum as source and PulseChain as destination (or the reverse when bridging out).
- Choose your token (for example HEX, USDC, WETH) and enter the amount.
- Approve the token allowance if required, then confirm the bridge transaction in your wallet.
Average bridge time is often roughly 10–30 minutes, though congestion can extend waits toward ~90 minutes. Track progress with transaction hashes on Etherscan (Ethereum) and PulseScan (PulseChain). If you see a pulsechain transaction not found message or think the pulsechain bridge is not working, confirm you are on the correct chain explorer before troubleshooting further.
What is the PulseChain Bridge (PulseBridge, BridgePulse)?
The PulseChain Bridge connects Ethereum and PulseChain for cross-chain transfers of ERC-20 tokens and stablecoins. Multiple front-ends exist—PulseRamp, bridgepulse, and community UIs—that may interact with the same core contracts. Always verify URLs.
- Cheaper gas fees compared to a congested Ethereum mainnet in many conditions.
- Access to PulseX and other PulseChain apps after funds arrive.
- Faster confirmations on PulseChain’s validator set, with block times often cited around a few seconds—actual times vary with network conditions.
- Built on audited, OmniBridge-style patterns with operational controls described in official documentation.
- Bridge contracts may be permissioned or upgradable for security operations—read the latest official disclosures.
Bookmark only URLs you have verified through official channels to reduce phishing risk.
How the PulseChain Bridge works under the hood
The bridge pulse mechanism typically uses a lock-and-mint model: tokens on Ethereum are locked in a contract while equivalent wrapped balances mint on PulseChain—and the reverse for returns.
- Bridge validators or relayers watch both chains and submit proofs to mitigate double-spends (design details vary by deployment).
- Forked PRC-20 copies from the launch period can differ from tokens created via bridge contracts—treat addresses as distinct.
- Never send tokens directly to arbitrary contract addresses; always follow the official UI flow.
- A pulsechain transaction not found error often means you are viewing the wrong explorer or the tx is not yet indexed.
Match RPC, chain ID, and explorer fields to official PulseChain documentation.
Step-by-step: bridge PulseChain and Ethereum safely
Ethereum → PulseChain
- Connect your wallet to the Ethereum network.
- Open the official front-end and select source / destination.
- Pick the token and amount, then approve (if needed) and confirm the bridge.
Many users bridge in to participate on PulseChain without selling assets on an exchange. Inbound flows typically still incur Ethereum gas; UI copy and fee schedules change over time—read the live interface.
PulseChain → Ethereum
- Switch your wallet to PulseChain (chain ID 369).
- Select PulseChain as source and Ethereum as destination.
- Confirm the transaction. Some implementations charge an outbound fee (for example around 0.3%) in addition to gas—verify in-app.
Keep ETH for Ethereum gas and PLS for PulseChain fees. Monitor hashes on both explorers until the bridge completes.
Setting up wallets and networks for PulseChain
Before using any pulse bridge UI, configure your wallet for PulseChain mainnet.
- Network name
- PulseChain
- RPC URL
- Use the public RPC endpoint published in current official documentation.
- Chain ID
- 369
- Currency symbol
- PLS
- Block explorer
- Use the block explorer URL published in current official documentation.
Add the network manually or use one-click tools on official sites. Some wallets ship presets (for example OKX Web3). Bridged token contract addresses can differ from forked PRC-20 copies—import the correct token contracts for the assets you hold.
Gas fees, limits, and timing
- Inbound to PulseChain: Interfaces may advertise low or zero inbound bridge fees, but you still pay source-chain gas (often Ethereum). Confirm the live UI.
- Outbound to Ethereum: Expect bridge fees on some routes (for example ~0.3%) plus gas on both sides as applicable.
- Limits: Check minimum and maximum amounts in the UI before large transfers.
- Queues: Congestion can show pending states without an error—allow extra time during spikes.
Third-party swap or routing layers (for example ChangeNow) can change the fee stack—read each provider’s disclosure.
Troubleshooting: pulsechain bridge not working or transaction not found
- Verify the correct network is selected in your wallet.
- Try official RPC endpoints if connections fail.
- Clear cache or try another browser if the dApp misbehaves.
- For pulsechain transaction not found, confirm you are on PulseScan for PulseChain txs—not only Etherscan.
- Wait 30–90 minutes during heavy traffic for validator batching.
- Never share seed phrases with anyone claiming to be support.
Alternative ways to bridge value
- CEXs: Exchanges such as OKX and MEXC may list PLS for deposit/withdrawal—compare spreads, fees, and KYC.
- Third-party swaps: Services like ChangeNow or TokensExpress may offer multi-chain routes—understand smart-contract and counterparty risk.
- Trade-offs: Official bridge routes aim at censorship resistance and minimized trust assumptions; CEXs require accounts; third parties add their own risk models.
Security best practices
- Verify URLs from official project sources and trusted channels.
- Use hardware wallets for large transfers when possible.
- Send a small test transaction first.
- Bookmark official bridge sites; watch for homoglyphs and fake domains.
- Revoke unused token approvals periodically (for example via Revoke.cash).
Exploring PulseChain after bridging
- Swap on PulseX for PLS, PLSX, HEX, and other tokens.
- Provide liquidity where you understand impermanent loss and protocol risk.
- Use community stats dashboards for trends—treat them as secondary to on-chain data you verify yourself.
- Plan exits via the official bridge or other routes you trust.
Some onboarding flows may airdrop a small amount of PLS to new addresses with zero balance so users can pay initial gas—availability and rules can change; read current UI messaging.
As a proof-of-stake network, PulseChain is positioned as more energy-efficient than proof-of-work alternatives at comparable throughput—compare claims to independent analysis.
FAQ: common questions about the PulseChain Bridge
Is the official PulseChain bridge safe?
Official implementations emphasize audited code and operational security, but all bridges carry smart-contract and operational risk. Verify URLs and do your own research.
How long to bridge PLS to Ethereum?
Often on the order of 10–90 minutes depending on conditions and route—check explorers for confirmation progress.
What does “pulsechain transaction not found” mean?
You may be on the wrong explorer or the transaction is not yet visible. Use PulseScan for PulseChain-native activity.
Why is my PulseChain bridge not working?
Check network selection, RPC endpoints, wallet connection, and allow time during congestion.
Are PulseBridge, PulseRamp, and BridgePulse the same?
They are different front-ends that may talk to the same core contracts—still verify each URL independently.
Example: bridging HEX from Ethereum to PulseChain
Connect on the official bridge, select HEX, enter an amount, approve if prompted, and confirm. After completion, confirm the bridged HEX balance on PulseChain in your wallet using the correct token contract.
Start with a test transaction, bookmark official links, and follow community updates. This article is informational only and not financial advice.